Input
Type (Thermocouple)
| Display |
Action |
Response |
|
|
Press
MENU
Press ENTER
|
ENTER
INPUT TYPE MENU:
1)
Press MENU, if
necessary, until
"inpt type" prompt
appears.
2) Display
flashes "rtd",
"t.c", or "proc"
(RTD, Thermocouple,
Process), if
the displayed
input type is
Tc, press MENU
to skip to step
5 (tc stops flashing). |
|
|
Press
MAX
Press ENTER
Press ENTER |
THERMOCOUPLE
SUBMENU:
3) Press
MAX to scroll
to "t.c" (flashing).
4) Display
flashes "stored"
message and "t.c"
stops flashing.
5) Display
flashes previous
thermocouple
type selection.
ie. "J" (see
below for types). |
|
|
Press
MAX
Press ENTER |
6) Scroll
through the available
thermocouple
types to the
selection of
your choice.
7) Display
flashes "strd"
message and advances
to the next menu
Reading Configuration |
Note:
Use the Input Type
(Thermocouple) (RTD)
or (Process) and verify
your Dip Switch Setting
(see section 2.4) and
your Electrical Installation
(see section 2.5).
See the following pages
for (RTD) and (Process)
menus.
Thermocouple Types:
(J, K, T, E, N, DIN
J, R, S, B, C)
Display: J CA
T E N DNJ R S B C
Input
Type (RTD)
| Display |
Action |
Response |
|
|
Press
MENU
Press ENTER
|
ENTER
INPUT TYPE MENU:
1) Press
MENU, if necessary,
until "inpt type"
prompt appears.
2) Display
flashes "rtd",
"t.c", or "proc"
(RTD, Thermocouple,
Process), if
the displayed
input type is
rtd , press MENU
to skip to step
5 (rtd stops
flashing).
|
|
|
Press
MAX
Press ENTER
Press ENTER |
RTD
SUBMENU:
3) Press
MAX to scroll
to "rtd" (flashing).
4) Display
flashes "stored"
message and "rtd"
stops flashing
5) Display
flashes previous
RTD type selection
ie. 392.2. |
|
|
Press
MAX
Press ENTER |
6) Scroll
through the available
RTD types to
the selection
of your choice.
7) Display
flashes "strd"
message and advances
to "rtd value". |
RTD
Types: 385, 392,
Two, Three and Four-wire
Display: 392.2,
392.3, 392.4, 385.2,
385.3, 385.4
Note: Last digit
indicates: 2, 3 or
4-wire input.
Input
Type (RTD Value)
| Display |
Action |
Response |
|
|
Press ENTER
|
RTD
VALUE SUBMENU:
4) Press
ENTER at "rtd
valu" prompt
to enter your
RTD Value. Display
flashes previous
RTD value selection
ie. 100 _ .
|
|
|
Press
MAX |
7)
Scroll through
the available
RTD Values to
the selection
of your choice |
|
|
Press ENTER |
8) Display
flashes "stored"
message and advances
to "Reading Configuration" |
RTD
Values: All RTDÆs
may be: 100 ohm 500
ohm 1000 ohm
Display: 100
_ 500 _ 1000
Input
Type (Process)
| Display |
Action |
Response |
|
|
Press
MENU
Press ENTER
|
ENTER
INPUT TYPE MENU:
1) Press
MENU, if necessary,
until "inpt type"
prompt appears.
2) Display
flashes "rtd",
"t.c", or "proc"
(RTD, Thermocouple,
Process), if
the displayed
input type is
Process, press
MENU to skip
to step 5 (rtd
stops flashing).
|
|
|
Press
MAX
Press ENTER
Press ENTER |
PROCESS
SUBMENU:
3) Press
MAX to scroll
to "Proc" (flashing).
4) Display
flashes "stored"
message and "Proc"
stops flashing.
5) Display
flashes previous
Process type
selection. ie.
"0-10" (see below
for types) InPt
Proc |
|
|
Press
MAX
Press ENTER |
6) Scroll
through the available
Process types
to the selection
of your choice.
7) Display
flashes "stored"
message and advances
to " Reading
Configuration". |
NOTE:
Use the Input Type
(Thermocouple) (RTD)
or (Process) and verify
your Dip Switch Setting
(see section 2.4) and
your Electrical Installation
(see section 2.5).

NOTE: For 4-20mA
Input select 0-20mA
and adjust the Input
Scale & Offset accordingly.
To adjust 4-20mA input.
(see example under
INPUT Scale & Offset)

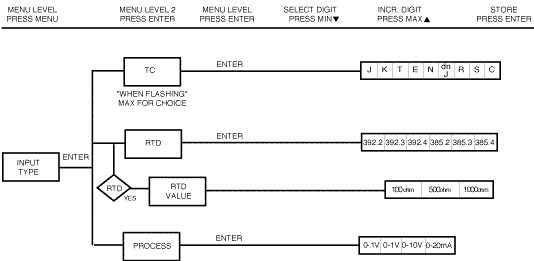
Figure
3.2
Flowchart for Input
Type
|
 TOC
TOC
 Back
Back
 Next
Next